Hello my friends, this is a post that I’ve been meaning to put together for ages, because this year, the number one question I received was, “how did you get started with knitting?” and I wanted to be able to send you to one place to figure it out for yourself too.
I actually learned back in high school on the way to a volleyball match. A teammate and friend was knitting and I was instantly intrigued. She taught me how and a few weeks later, I’d completed my very wonky and wavy-edged scarf that ended up being about 4x as wide as I expected, but I’d learned the basics and was hooked.
Despite loving it, I never actually tried knitting anything other than a blanket or scarf until just last year. I have that, “how hard could it be?” gene, so after a couple of simple projects, I jumped into making shirts and sweaters and have loved every minute of it. Even the frustrating ones where you realize you have to pull out half your project because you messed up, ha!
So, without further ado, I’ve created a simple How to Knit series for you that includes video tutorials, because seeing it all happen in real time is the best way to figure things out. At least it is for my visual brain. I’ve included 4 simple steps and skills you’ll need to master to move onto bigger projects, so grab some test yarn and needles and get knitting! I hope you find this hobby to be as rewarding and calming as I do!
How to Knit for Beginners: Step by Step Tutorial with Videos
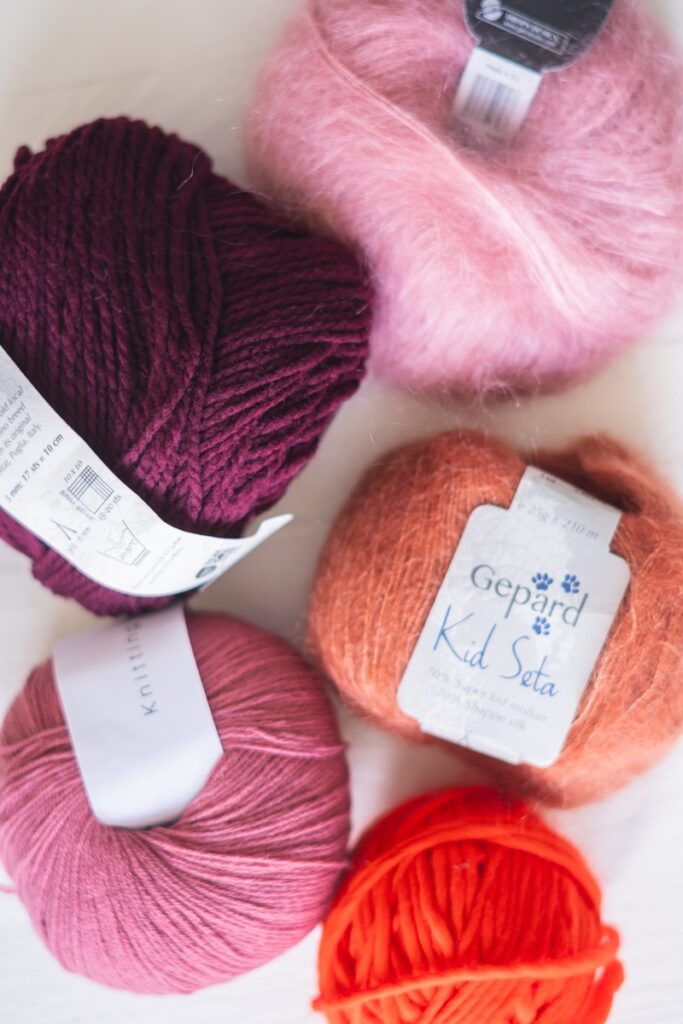
What You’ll Need:
- Bulky weight yarn, I’m using this Cascade Superwash 128 in these videos
- US 8 (5mm) needles—straight or circular though I prefer circular
When I saw “bulky weight yarn” I don’t just mean go pick something chunky, bulky weight is actually a weight classification for yarn. You’ll see it on the website or in store on the packaging. This is a great weight to start with because it’s easy to grip and not difficult to work with.
For your needles, I’d recommend using bamboo or wooden needles over metal. This is my personal preference, but for learning, I find it much easier as metal needles are super slippery and your project can easily fall off. Bamboo needles have a bit more grip to them.
When practicing, I wouldn’t intend on this project being anything. The goal here is simply to master the basic techniques!
1. Cast On
Casting on is the essential first step in any knitting project, allowing you to set up the foundation for your stitches. It’s how you get your yarn on the needles and get your project started.
For beginners, the “Long Tail Cast On” method is highly recommended due to its versatility and ease of use. This is also a cast on that you can use for a ton of projects! To get started, you’ll need a length of yarn that is about three times the width of your intended project, which will create a tail for your cast-on stitches. For starters, just add anywhere between 12-20 stitches. If you don’t make it long enough, you’ll have to pull it out and start again, which isn’t a big deal, but it’s good to know!
Begin by making a slip knot and placing it on your needle. Hold the needle with the slip knot in your right hand and the working yarn (the yarn connected to the ball) in your left hand. With your thumb and index finger, create a loop using the tail of the yarn, ensuring the yarn runs in front of the needle. Now, swing your right needle into the loop created by your thumb, pivot around, and pull the working yarn through the loop. Gently tighten the stitch by pulling on the yarn. Repeat this process until you have the desired number of stitches on your needle.
Practice a few times, and remember that it’s okay to make mistakes—learning anything new will have mistakes, just pull it out and try again!
2. Knit Stitch
Now that you’re yarn is on your needles, it’s onto knitting! The knit stitch is the foundational stitch in knitting, and once you master it, you’ll be well on your way to creating countless projects. To begin, hold your needle with the cast-on stitches in your left hand and the empty needle in your right hand. Ensure that the working yarn is coming from the right-most stitch on your left-hand needle and is positioned at the back of your work.
Next, to create your knit stitch, insert the tip of your right needle into the first stitch on the left needle, moving from left to right, this is called “knit-wise”. Once the tip is through, wrap the working yarn around the right needle from back to front. This action will create a loop on the right needle. Carefully pull this loop through the stitch on the left needle, changing the angle of the right needle to a more horizontal position to ease the movement. As you do this, you can gently scrape the tip of your right needle against the left needle to prevent the yarn from slipping off.
After pulling the yarn through, you’ll have two loops on your right needle. Next, drop the original stitch off the left needle, and to finish the knit stitch, tighten the new stitch, but not crazy tight, on your right needle by pulling on the working yarn. Repeat these steps until you have worked through all the stitches on your left needle. For all my visual learners, this video should make it totally clear.
Remember to keep the working yarn consistently at the back of your work as you knit, ensuring a smooth and even tension throughout your stitches. With a little practice, you’ll be able to execute the knit stitch with ease, paving the way for more complex knitting techniques in your future projects!
3. Purl Stitch
The purl stitch is a key technique in knitting and often the second stitch that beginners learn after mastering the knit stitch. While it may feel a bit awkward at first, with practice, you’ll become more comfortable with it. The purl stitch is the exact opposite of the knit stitch and will allow you to create different stitch patterns in the future—think ribs, cables, etc.
To start, hold your knitting with the working yarn positioned in front of your work. Remember, when knitting, the yarn is in the back, put purling, the working yarn is in the front.
Begin by inserting your right-hand needle into the stitch on the left-hand needle from the right to left, this is called “purl-wise” . This is the crucial difference from knitting, where you would insert the needle from the left to right in the front. Once the right needle is through the stitch, wrap the working yarn around it counter-clockwise, which means bringing the yarn over the needle and around to the left. Now, catch the yarn with the tip of the right needle and pull it through the stitch, bringing a new loop through to the front.
Finally, slide the original stitch off the left needle, allowing the new purl stitch to remain securely on the right needle. Repeat this process across your row, and soon you will have created a beautiful texture with bumps on the front side of your work. Don’t forget to keep practicing, as mastering the purl stitch will open up a world of patterns, including ribbing and stockinette stitch! Happy knitting!
4. Cast Off
Casting off, also known as binding off, is the final step in completing your knitting project and securing the stitches to prevent unraveling. To start, knit one stitch, then knit another. Now that you have two stitches on your right needle, we can begin the cast off process.
Once you have two stitches on your right needle, use your left needle to lift the first stitch over the second stitch and off the needle. This action creates a bind, securing the first stitch and leaving just one stitch on your right needle. Continue this process: knit another stitch, then lift the previous stitch over the newly knit stitch and off the needle. Repeat these steps until you reach the end of the row, ensuring you always have two stitches to work with.
When you have only one stitch left on the needle, cut your working yarn, leaving a tail about six inches long. Pull your tail through this last stitch to secure it and then weave in the ends to finish your project neatly. With a little practice, casting off will become a natural part of your knitting routine, allowing you to proudly complete your creations!
As you advance, you’ll learn there are different cast off techniques that work better for different projects, but for now, this is a great way to finish many projects.
There you have it! With these 4 basic steps under your belt, you’re officially knitting! Keep practicing these until you feel like you really have them mastered. These basic techniques, especially knit and purl are the basis for any knitting project. If you have any questions, let me know and I hope this was super helpful!
P.S. Don’t forget to sign up for Maker’s Mail to get updates on new projects to inspire yourself to keep creating!